


Source: Supra-Gingival Minimally Invasive Dentistry: A Healthier Approach to Esthetic Restorations, published by Wiley-Blackwell
Supra-gingival, minimally invasive dentistry is a modality or style of dentistry which uses the latest materials and innovative techniques to keep restorations (fillings, crowns, veneers, onlays, etc.) above the gum line. This new and innovative approach uses the most minimally-invasive techniques available.
This approach assumes that the most subgingival margins are preventable and that all damaged teeth can be restored with a partial-coverage direct or indirect restoration. The exception, however, are teeth already cut for previous crowns, thus preserving the tooth and the health of the pulp and periodontium.
This approach also recognizes how the continued use of traditionally mechanically retained dental techniques is counterproductive to adhesive dentistry. It comes with the negative effects of tooth removal that is unnecessary and the catastrophic consequences of subgingival margins placement.
In most cases, the supra-gingival protocol makes supragingival margins possible. The supragingival restorative margins make adhesive dentistry simple and predictable and makes restorative dentistry easier and faster for the clinician, healthier for the patient, esthetically pleasing, and provides for long-lasting predictable results.
When caries or an old restorations are subgingival, there is a protocol for repairing and isolating the damage. This helps to avoid further damage to the tooth or the periodontium. This employs the great benefits of adhesively retained translucent restoration.
A byproduct of esthetic needs, restorative mechanical needs, and old restorative rules has traditionally been the final gingival margin placement.
The end result of subgingival margins is therefore considered both normal and necessary. To break through this paradigm, new rules are needed and the location of the final gingival margin is intentional.
There are several rules to both preserve supragingival margins when possible and repair subgingival margins when necessary.
The five principles of supra-gingival dentistry summarize the implementation of a supragingival protocol to overcome the the reasons behind why restorative margins end subgingivally and how to eliminate or minimize the need to prepare traditional full crowns.
These five principles will help to prevent or minimize subgingival restorative margins greatly with both direct and indirect restorations.
The First Principle: Careful Removal of Caries and Old Restorative Material Close to the Gingival Margin.
The tooth’s gingival margin is crucial to a successful bonding procedure. Because of this, it becomes necessary to take greatcare while removing caries and restorative material in this region. When the preparation is close to gingival, much care and respect should be placed when the bur gets close to pulp (Figure 1). Nevertheless, the lack of an intentional supra-gingival protocol and a general acceptance that subgingival margins are inevitable and normal can influence the decision made about the final preparation margin’s location.
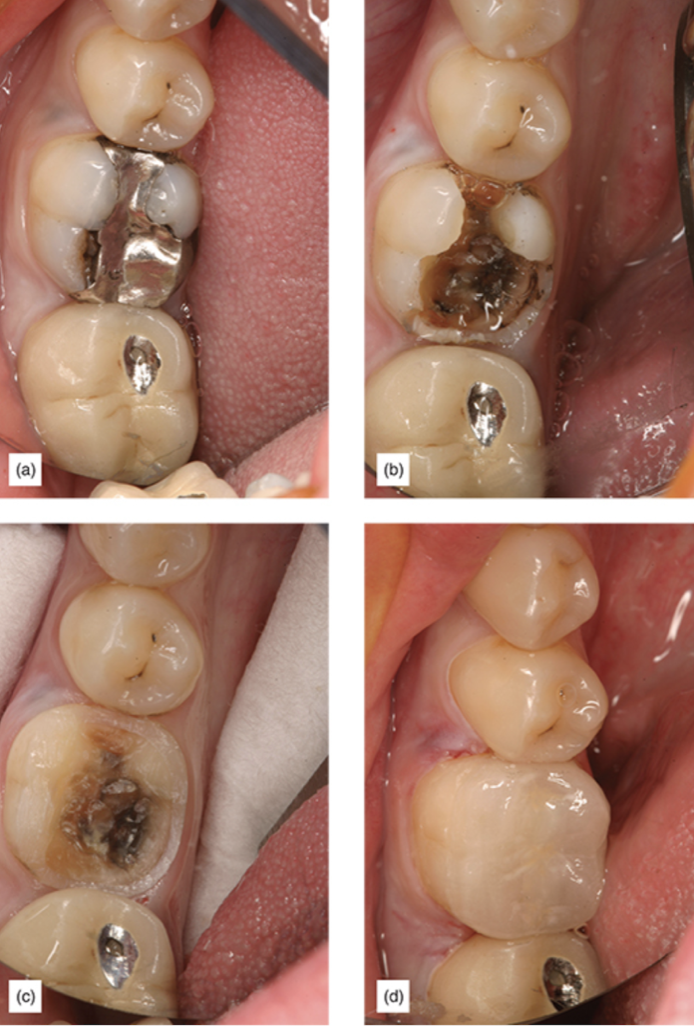
Figure 1: (a) Large silver filling with caries. (b) The lingual side of the tooth appears to be both deeply subgingival and hopeless for a bonded restoration. (c) With careful technique, the margin was only about 1 mm subgingival and manageable for a bonded restoration. (d) The final supragingival restoration.
When working close to the pulp, a different attitude exists. Restorative dentists use special techniques and tools such as spoon excavators, slow-speed burs that are large and round, and caries-indicating dyes to carefully remove caries close to the pulp. With proper technique, pulp exposures can be minimized or avoided, according to the literature and experience [1]. That same extreme care should be applied when preparations reach the gingival margin as well. This will minimize and even prevent subgingival margins (Figure 2). In the marginal area, good illumination and magnification are desirable.
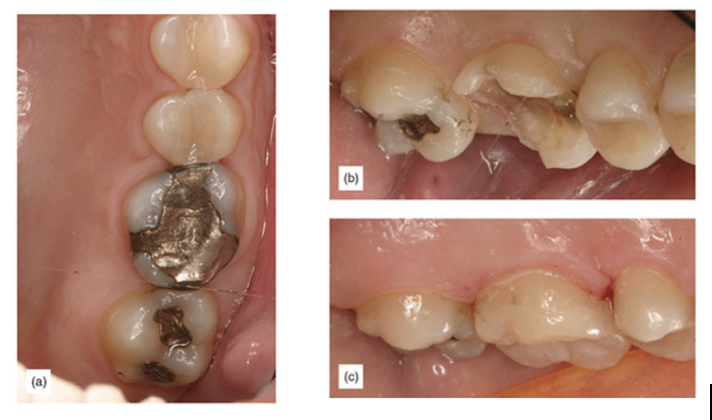
Figure 2: (a) Deep gingival margin. (b) Removal of caries completed. (c) Final supragingival restoration.
There are times when subgingival caries or restorative material are inevitable. However, the damage can be limited with careful technique.
While a subgingival margin of 1.5 mm or more will create more complications and uncertainty, a slightly subgingival margin of 0.5 mm is manageable. Even 1-2 mm can make all the difference in this area.
The Second Principle: Avoid Boxes, Axial Reduction or Counterproductive Mechanical Retention (Trust in Adhesion)
Interproximal boxes and axial reductions are part of the fabric of restorative dentistry [2] due to a lack of trust in adhesion. However, trust in adhesion would make mechanical retention obsolete [Figure 3].
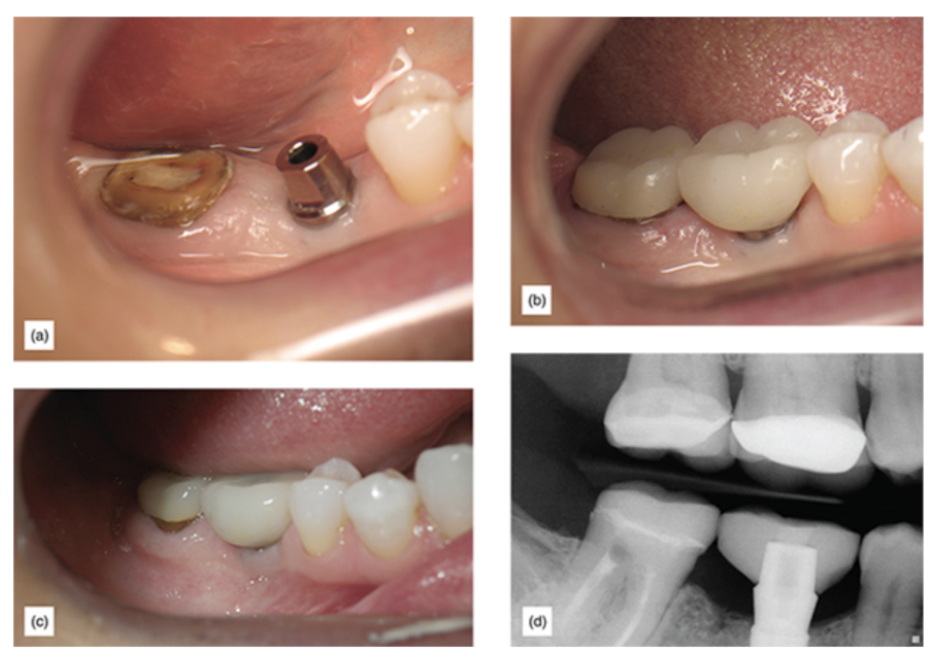
Figure 3: (a) Second molar, which had a fractured crown at gum level. (b) Crown with zero mechanical retention cemented. (c) The same crown 6 years postoperatively. (d) X-ray of the crown 6 years postoperatively.
This lack of trust in adhesion, along with habit and education, makes it normal for clinicians to make a traditional dimension proximal box every time interproximal caries need to be removed independently of how large the caries may be [Figure 4].

Figure 4: Traditional onlay preparation showing aggressive mechanical retention features (courtesy of Dr Boris Keselbrener).
When a marginal ridge is weak and needs occlusal coverage, the usual way of proceeding is a traditional box. Proximal boxes have also been used as an indispensable part of a mechanically retentive preparation for both direct and indirect restorations [Figure 5].
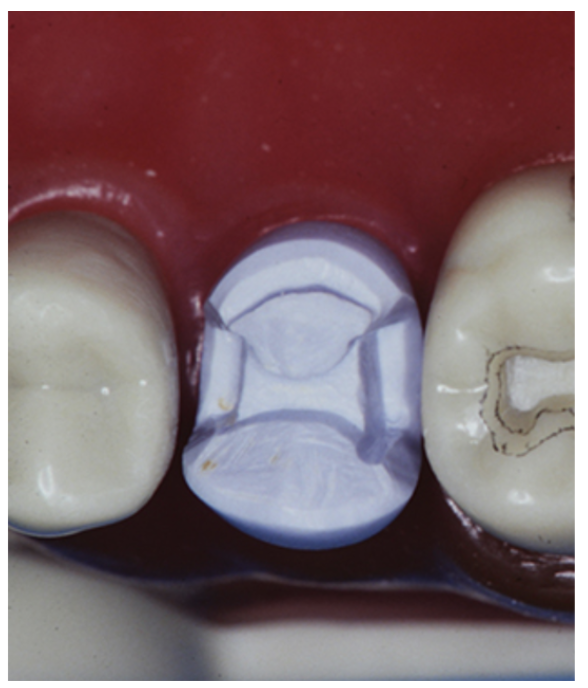
Figure 5: Boxes with subgingival margins on x-ray.
Nevertheless, proximal boxes have some serious disadvantages, such as requiring a large amount of usually healthy teeth to be removed. Additionally, traditional boxes require proximal clearance, including gingival clearance.
Until this clearance is achieved, the universal approach to gaining gingival clearance has been to continue to drop the gingival floor of the box.
This technique has two negative consequences. First, as the gingival floor is dropped, the margins become subgingival and bleeding will occur [Figure 6]. Second, the enamel thickness decreases to the point that it is sometimes lost.
Both consequences are counterproductive to adhesive procedures.
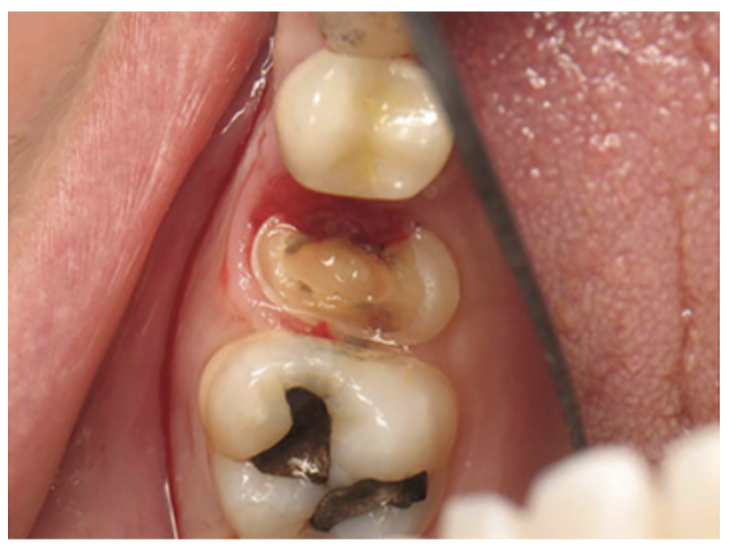
Figure 6: Box with bleeding subgingival margin.
Similarly counterproductive is the preparation of axials walls and ferrules. This often forces margins to go subgingival for the purpose of retention and resistance forms.
Adhesive retention is enough to support any restoration, and without the need for mechanical retention. Therefore, the proper use and trust in adhesion prevents subgingival margins [Figure 7].
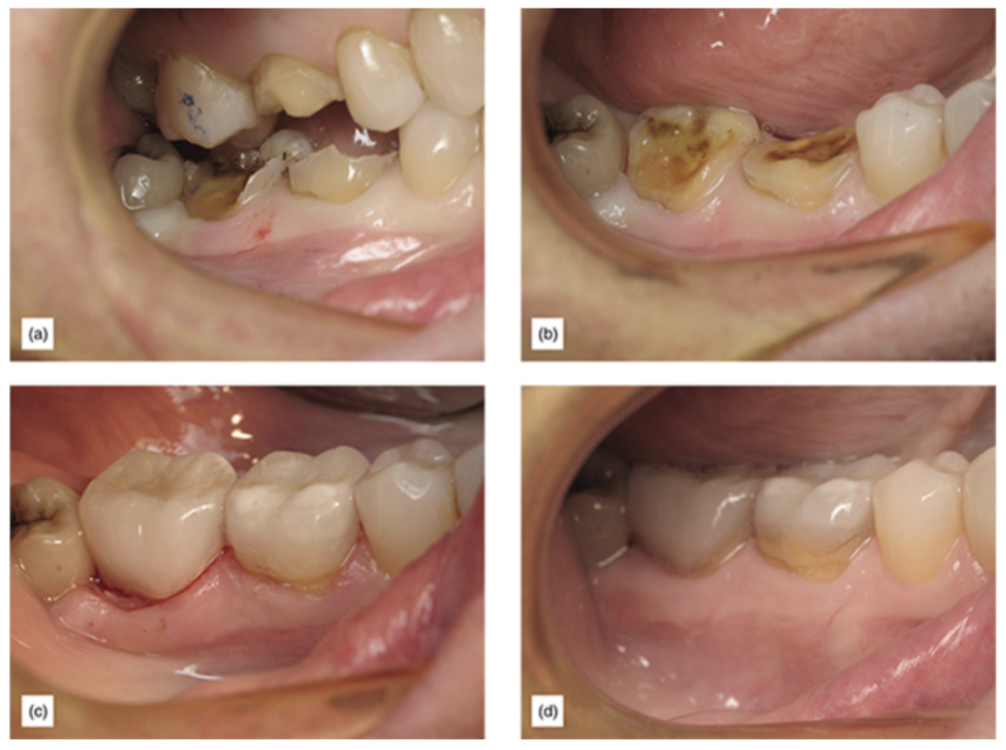
Figure 7: (a) Teeth of a frail patient who was previously treated for root canal/post/crown plus crown lengthening surgery. (b) After a minor preparation, preserving as much tooth as possible and enamel margin. (c) Immediately after cementation. (d) One year postoperatively.
During an indirect onlay preparation a simple U-shaped 2+ mm reduction of the marginal ridge and proximal area can substitute proximal boxes. This is then followed by an alternative procedure to create clearance. Instead of dropping the gingival floor for clearance, a “cervical margin separation technique” can be used to gain the necessary clearance needed for a clean impression [Figure 8].
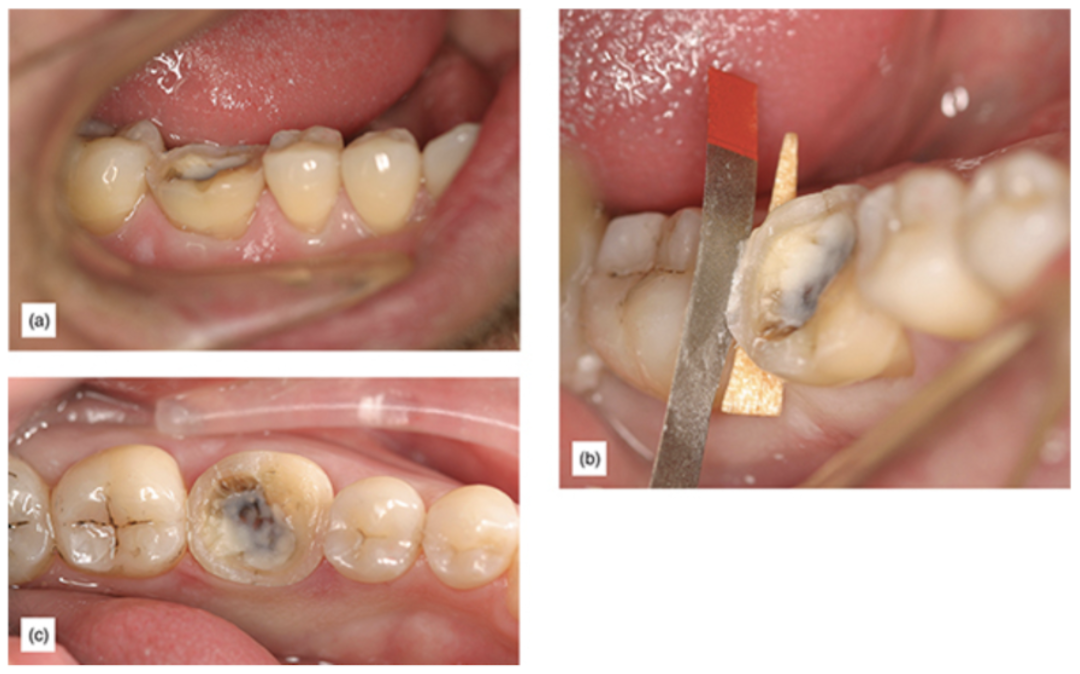
Figure 8: (a) After the occlusal reduction, the cavosurface margin continues to be in contact with the adjacent tooth. (b) Clearance created with the cervical margin separation technique. This allows restoration margins to remain supragingival. (c) The final preparation with clear proximal margins.
The Third Principle: Enamel Margin Preservation Technique
The idea of preserving enamel for esthetic or restorative purposes is not new [3, 4]. However, a well-entrenched basic rule of cavity preparation is the removal of all unsupported enamel to prevent enamel fracture [5].
It is important to understand that rules like removing enamel without dentinal support applied at a time when dentistry did not have adhesives. The benefit of preserving some enamel just for the sake of doing so has no great clinical value.
On the other hand, the benefits of enamel preservation at the marginal level to allow for a supragingival margin is of great importance. It simplifies and increases the predictability of every following procedure (Figure 9).
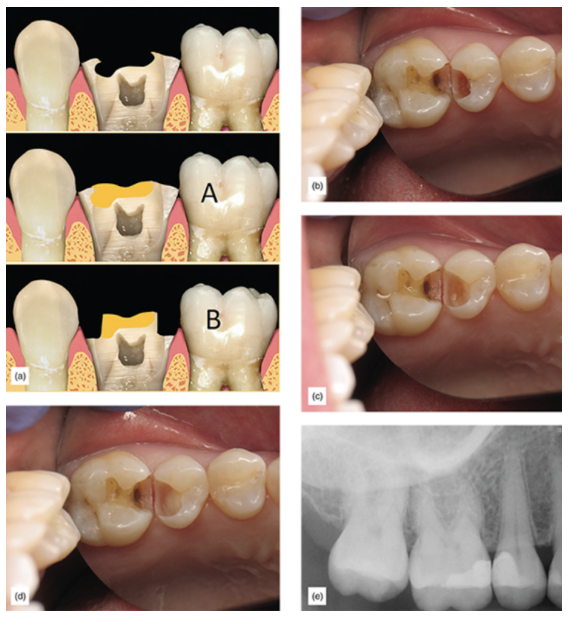
Figure 9: Outcome comparison: (a) A badly damaged tooth with unsupported enamel after a supragingival approach (A) or with traditional crown preparation approach (B). (b) Deep caries on bicuspid; enamel is healthy but there are much deeper caries on the dentin. (c) Dentin caries continues while healthy enamel is preserved supragingivally. (d) All caries have been removed, and an indirect pulp cap has been placed. (e) Final x-ray showing discrepancy between supragingival enamel level and dentin level; supragingival
It is also well documented that finishing a restoration on enamel increases the long-term seal of a restoration [6].
For direct restorations, this method of allowing the preparation cavosurface margin and restorative margin to remain supragingival will greatly simplify direct restorations.
Supragingival margins are easier to isolate, easier to place matrix bands, seal the margin with a wedge, restore, and remove composite flash and finish, making direct restorations easier and more successful (Figure 10). In indirect cases, after the enamel margin preservation procedure is finished, an impression will be performed with ease, and subsequently the adhesive procedure to bond an onlay or veneer will be greatly simplified by the easy isolation allowed by supragingival margins. The bonded restoration will further cover and protect the preserved enamel margin further reinforcing the area (Figure 11).
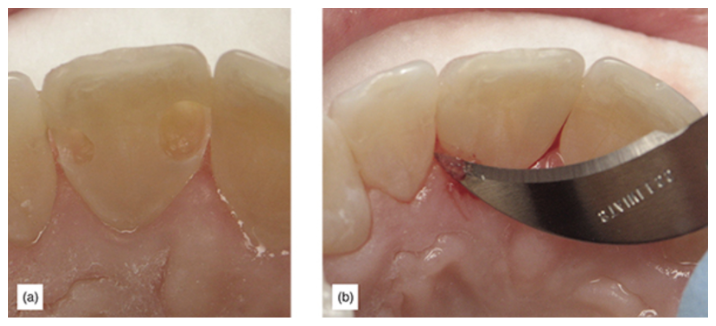
Figure 10: (a) Enamel preservation in a direct clinical case. (b) Supragingival margins allow for a much easier cleanup of composite flash and finishing.
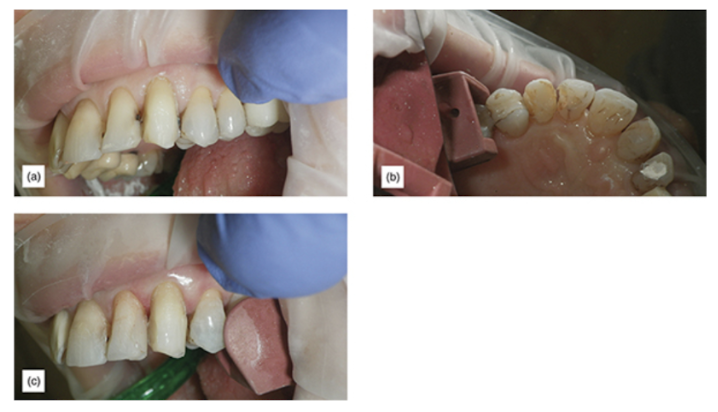
Figure 11: (a) Caries which appear to go deeply subgingival, after initial veneer preparation. (b) Lingual view of extreme caries and removal using enamel preservation technique preparation. (c) Finishing preparation, after repair with composite; the tooth looks natural.
Enamel margin preservation is used in cases with extensive cervical caries, where the enamel is healthy but the dentin is infected. The supragingival enamel is carefully preserved without dentin support, and the unsupported enamel is subsequently repaired with properly bonded composite. Based on evidence from the literature, it is reasonable to expect that the enamel will regain a large part of its original strength [7,8,9].
It is well known that enamel without dentinal support is weak. For that reason, a careful and well thought out protocol must be followed to protect such enamel during the repair procedure and to minimize polymerization forces which could cause cracks in the enamel. In an in vitro study, Ruiz and Finger demonstrated no enamel micro-cracks on unsupported enamel when using a technique for preserving enamel [10]. Improved results were obtained when the enamel thickness was greater than 1 mm (Figure 12).
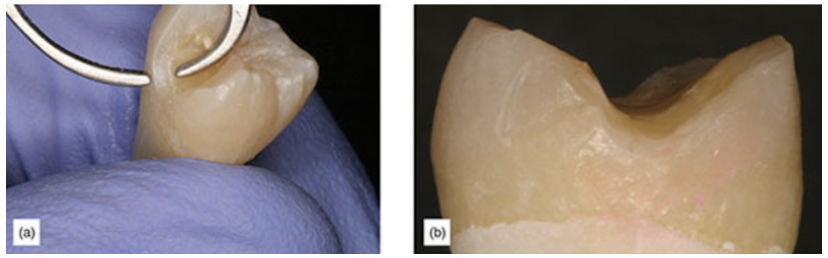
Figure 12: (a) Tooth prepared for enamel preservation study (1 mm thick enamel). (b) A close-up of non-stained margin on enamel preservation study.
The Fourth Principle: Technique for Margin Elevation
There are many cases in which caries or old restorative margins are already subgingival.
Clinical experience shows that 0.5–1 mm of subgingival margin is usually easy to manage when limited to a small area. Isolation and good bonded cementation are possible. When the restorative margin is deeper than 1.5 mm below the gingiva, isolation during adhesive cementation may be compromised and may be less predictable and less successful.
In such cases, a traditional mechanically retained full crown is usually indicated, which allows the use of resin-modified glass ionomer (RMGI) crown and bridge cement (such as Meron Plus AC, VOCO, or RelyX™ Luting Cement, 3M) which are less sensitive to contamination [11]. A more expensive, painful and complicated option would be crown lengthening, which also would be mandatory if the cavosurface margin will violate the biological width [12].
An alternative technique to a traditional crown or crown lengthening is a procedure called margin elevation (Figure 13) [13,12,14,15]. This procedure has been shown to be successful and to simplify and increase success with indirect restorations. It is used after the removal of caries and old restorative materials, when the margin is considerably subgingival.
At that point, a matrix band is placed and the buildup or elevation is performed. It could be considered to be a short class II restoration, without the need to achieve proximal contacts. One important advantage of this technique is that, when the correct technique is used, the polymerization shrinkage and stresses are favorable. A better cervical marginal seal can be achieved when the first increment is isolated on one bonded surface. The cervical floor and the polymerization shrinkage will pull the composite towards the bonded margin surface [16,17].
Care must be taken to perform a meticulous isolation, creating a well-sealed restoration. Confirmation with an x-ray is desirable, together with clinical confirmation of marginal seal (Figure 14). Using a very highly radiopaque flowable composite will make x-ray verification easier. RMGI may be used for the margin elevation, although it is currently less popular. To avoid margins which mistakenly appear on the x-ray to be open, a very thin bonding agent is desirable, unless the bonding agent is radiopaque.
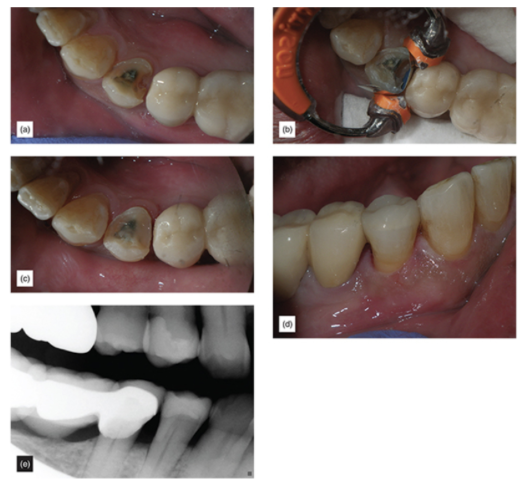
Figure 13: (a) Extremely subgingival margin. (b) Correctly isolated using the matrix band. (c) After margin elevation. (d) The finished restoration. (e) Final x-ray.
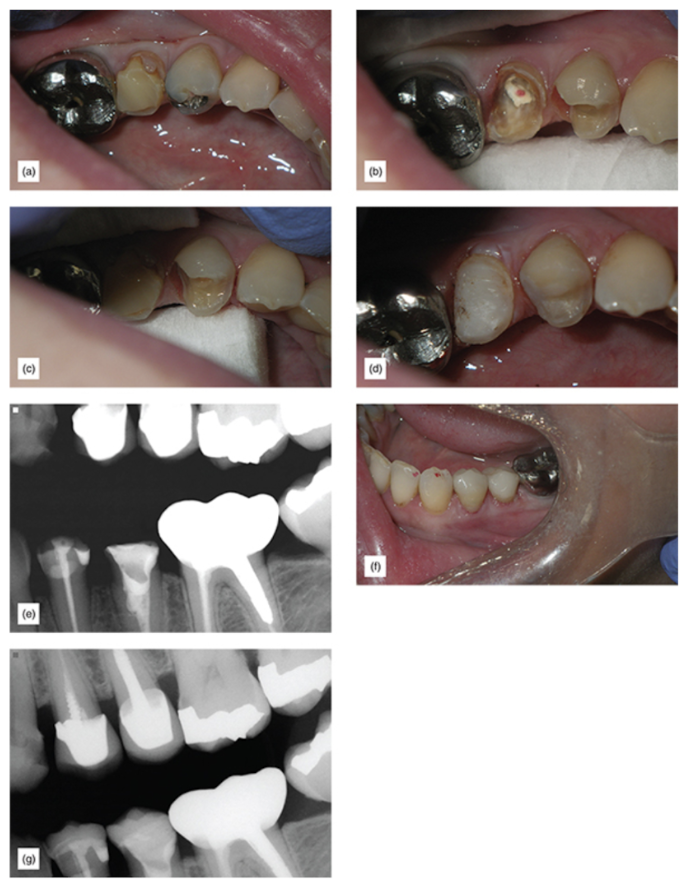
Figure 14: (a) This patient was informed of the poor prognosis of the second bicuspid. (b) Observe the extent of the damage to both teeth. (c) A different view to show how subgingival the margins are, and how difficult this would be if indirect bonded restorations were attempted with gingiva this deep. (d) After margin elevation. (e) X-ray confirming good margin elevation seal. (f) Immediately after cementation. (g) Two years postoperative x-ray. After the margin elevation, an impression will be taken and the tooth can be provisionalized. The bonded cementation will be easy and stress free, as all margins will be supragingival.
The Fifth Principle: Proper Use of Translucency for Ideal Restorative Margin Blending and Esthetics
The blending of the tooth and the restorations is dependent upon the amount of light allowed through to the tooth by the restorative material. It is desirable to create a “contact lens” effect for maximum blending of the restorative margin.
Three factors are crucial to achieve the desirable blending.
The first factor is the correct choice of restorative material, its level of translucency and thickness. The second factor is the translucency or opacity of the chosen cement, and the third is the underlying tooth color.
A naturally translucent restoration, especially at the margin level, facilitates placing restorative margins supragingivally. Lack of knowledge about how to manage translucency and lack of understanding of the disadvantages of subgingival margins have made the use of opacious materials popular, sometimes even intentionally avoiding more translucent options [18].
The use of opacious restorations makes subgingival margin placement a standard procedure (Figure 15). Remedying a large difference in shade with the restorative materials (porcelain or composite) will require the use of opacious materials. Opacious materials are less esthetically pleasing, and often lead to final restorations which look opacious, and to poor restorative marginal blending, forcing a subgingival margin placement (Figure 16).
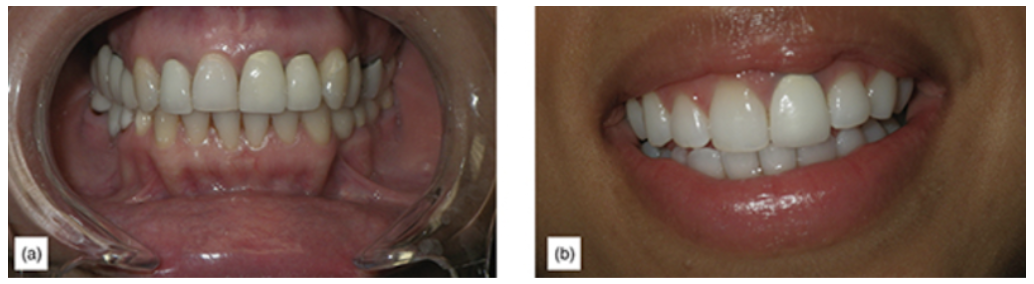
Figure 15: (a) Anterior crown with subgingival margins. (b) Extremely non-esthetic, opacious porcelain-fused-to-metal crown.
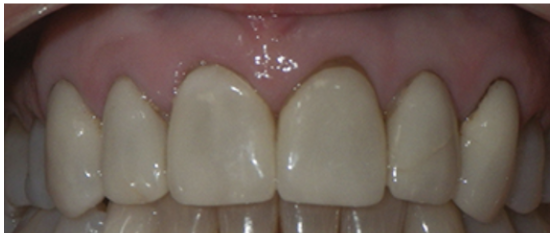
Figure 16: Opacious-looking restorations.
On the other hand, using translucent materials requires attention to the color of the tooth substrate, because this will affect the final shade of the restoration [19]. Thus, it is often desirable to whiten the teeth before the restorative procedure is performed, to obtain a shade closer to the desired final shade. This will allow for the use of a more translucent restorative material, with more natural results and better margin blending with supragingival margins (Figure 17).
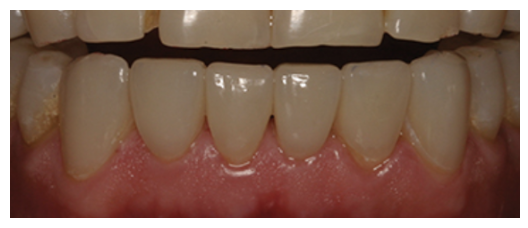
Figure 17: Almost 1 mm supragingival margins on six lower anterior veneers, 1 year postoperatively.
In-office bleaching products such as Venus White® (Kulzer) are very successful (Figure 18). In cases of dark endodontic treated teeth, it would be desirable to undertake internal bleaching to get a dark tooth to appear lighter and closer to the final desired shade (Figure 19).
Although there is a chance of color relapse (with good technique, the risks are small), the alternative would be to routinely place the crown margin subgingivally. This is less healthy, because subgingival margins will cause inflammation, leading to gingival resection and ultimately exposure of the unsightly margin. Nevertheless, very dark teeth are problem cases and any solution is a compromise.
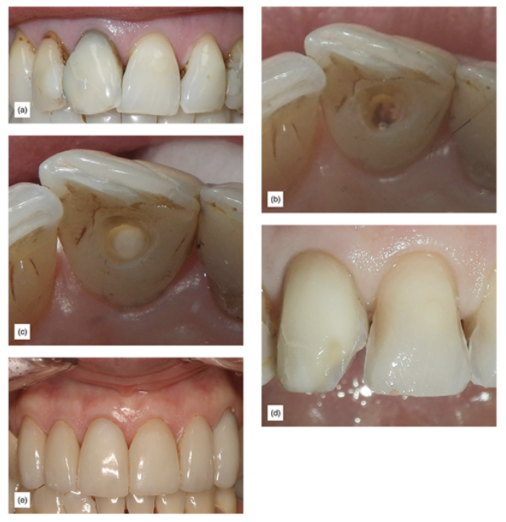
Figure 18: (a) Dark tooth before internal bleaching. (b) Open endodontic access and removal of pulp and cement debris. (c) Lingual view after one cycle of internal bleaching. (d) Veneer preparation procedure showing how much more simple this case is now. (e) The final restoration.
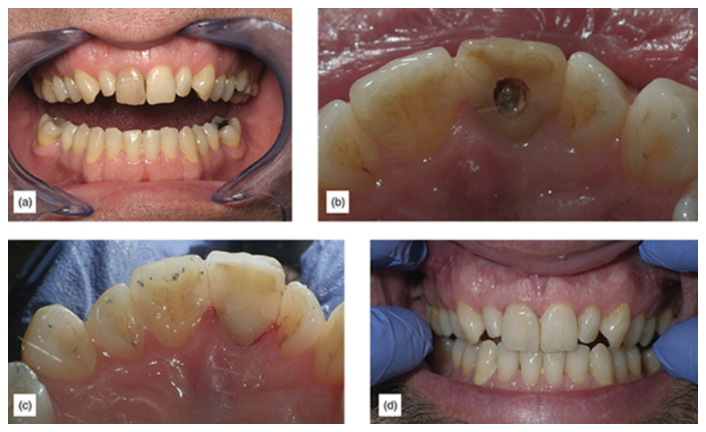
Figure 19: (a) Extremely dark central. (b) Lingual view before internal bleaching. (c) Internal view after bleaching and endodontic access filled. (d) Final veneer cemented with supragingival margins.
Understanding that anterior and posterior teeth have very different esthetic and occlusal requirements means that the material chosen will vary. The more anterior the teeth, the higher the esthetic requirements, and the lower the occlusal force, so layered feldspathic or pressed ceramics are often indicated.
In the posterior region, the forces are higher, and the esthetic requirements are lower, so materials with complementary properties, such as lithium disilicate, layered or monolithic zirconia or Lava™ Ultimate Restorative (3M), would be desirable.
It is interesting to note that, generally speaking, the more translucent, the material the weaker it is, although this is not an absolute [20].
Finally, the science of translucency is complicated [21]. There is limited practical clinical knowledge of translucency and how to communicate it. For that reason, restorative dentists should simplify communication with laboratories and colleagues. Use translucency values equivalent to dental structures similar to those commonly employed with composites [22]. The thickness of the restorations and the use of the correct cement based on the requirements for translucency is of great importance and will be discussed in a later publication.
We hope this article was valuable to you. Our mission is to provide proven, real-world practical techniques, resources, articles and videos to help the community of caring dentists, who value the benefits of minimally invasive Supra-gingival dentistry, expand their knowledge and achieve clinical success, thus giving their patients a healthier form of dentistry.
For updates on newly published articles, courses, and more, sign up for our newsletter.
Los Angeles Institute of Clinical Dentistry & Ruiz Dental Seminars Inc. uses reasonable care in selecting and providing content that is both useful and accurate. Ruiz Dental Seminars is not responsible for any damages or other liabilities (including attorney’s fees) resulting or claimed to result in whole or in part, from actual or alleged problems arising out of the use of this presentation. The techniques, procedures and theories on this presentation are intended to be suggestions only. Any dental professional viewing this presentation must make his or her own decisions about specific treatment for patients.
Sources
- Alleman DS, Magne P. A systemic approach to deep caries removal end points: The peripheral seal concept in adhesive dentistry. Quintessence Int, 2012; 43(3): 197-208.
- Black GV. The Technical Procedures in Filling Teeth. Chicago: HO Shepard Co. Printers; 1899, pp. 20–21.
- Denehy GE, Torney DL. Internal enamel reinforcement through micromechanical bonding. J Prosthet Dent, 1976; 36(2): 171–175.
- Hilton TJ, Broome JC. Direct posterior esthetic restorations, in Summitt’s Fundamentals of Operative Dentistry: A Contemporary Approach, 4th ed. Chicago, IL: Quintessence Publishing, pp. 279–323.
- Black GV. Operative Dentistry. Chicago, IL: Medico-Dental Publishing Company, 1908, p. 115.
- Tredwin CJ, Stokes A, Moles DR. Influence of flowable liner and margin location on microleakage of conventional and packable class ii resin composite. Oper Dent, 2005; 30(1): 32–38.
- Ayad MF, Maghrabi AA, García-Godoy F. Resin composite polyethylene fiber reinforcement: effect on fracture resistance of weakened marginal ridges. Am J Dent, 2010; 23(3): 133–136.
- Mirzaei M, Ghavam M, Rostamzadeh T. Reinforcement of unsupported enamel by restorative materials and dentin bonding agents: an in vitro study. J Dent (Tehran), 2010; 7(2): 84–88.
- Eidelman E. Composite resin support of undermined enamel in amalgam restorations. Pediatr Dent, 1999; 21(2): 118–120.
- Ruiz JL, Finger WJ. Enamel margin preservation and repair technique. J Dent Res, 2016: 95(Spec Iss 5): abstract 2370749.
- Lindquist TJ, Connolly J. In vitro microleakage of luting cements and crown foundation material. J Prosthet Dent, 2001; 85(3): 292–298.
- Padbury A Jr. Interactions between gingiva and the margin of restorations. J Clin Periodontol, 2003; 30(5): 379–385.
- Dietschi D, Olsburgh S, Krejci I, Davidson C. In vitro evaluation of marginal and internal adaptation after occlusal stressing of indirect class ii composite restoration with different resinous bases. Eur J Oral Sci, 2003; 111: 73–80.
- Frankenberger R. Effect of proximal box elevation with resin composite on marginal quality of ceramic inlays in vitro. Clin Oral Invest, 2013; 17(1): 177–183.
- Roggendorf MJ, Krämer N, Dippold C, Vosen VE, Naumann M, Jablonski-Momeni A, Frankenberger R. Effect of proximal box elevation with resin composite on marginal quality of resin composite inlays in vitro. J Dent, 2012; 40(12): 1068–1073.
- Ferracane JL. Developing a more complete understanding of stresses produced in dental composites during polymerization. Dent Mater, 2005; 21(1): 36–42.
- Braga RR, Hilton TJ, Ferracane JL. Contraction stress of flowable composite materials and their efficacy as stress-relieving layers. J Am Dent Assoc, 2003; 134(6): 721–728.
- Chu FC, Chow TW, Chai J. Contrast ratios and masking ability of three types of ceramic veneers. J Prosthet Dent, 2007; 98(5): 359–364.
- Azer SS, Rosenstiel SF, Seghi RR, Johnston WM. Effect of substrate shades on the color of ceramic laminate veneers. J Prosthet Dent, 2011; 106(3): 179–183.
- Barizon KT, Bergeron C, Vargas MA, Qian F, Cobb DS, Gratton DG, Geraldeli S. Ceramic materials for porcelain veneers: Part II. Effect of material, shade, and thickness on translucency. J Prosthet Dent, 2014; 112(4): 864–870.
- Johnston WM. Review of translucency determinations and applications to dental materials. J Esthet Restor Dent, 2014; 26(4): 217–223.
- Kim DH, Park SH. Evaluation of resin composite translucency by two different methods. Oper Dent, 2013; 38(3): E1–15.