

Source: Supra-Gingival Minimally Invasive Dentistry: A Healthier Approach to Esthetic Restorations, published by Wiley-Blackwell
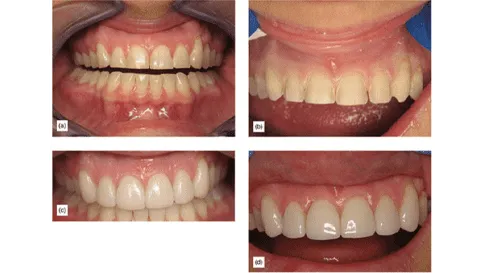
The goal of facial preparation for porcelain veneers is to remain supragingival and within the enamel. However, in instances of severe tooth damage, some buildups and additional techniques may be necessary. The simple preparation method is employed for a mostly intact tooth, serving to create space for the chosen restorative material, address esthetic requirements, and the requirements to simplify fabrication by the laboratory technician. Being as minimally invasive as possible, preserving healthy enamel, and keeping a supragingival margin placement is desirable. See in Figure 1 how worn dentition treated with porcelain veneers (a) and with supragingival minimal preparation (b) has esthetic results (c), and even six years later, with some cervical margins, the results remain esthetic (d).

Figure 1
Typically, the basic facial preparation for porcelain veneers is conducted on teeth that are mostly intact. Occasionally, a minor class III cavity or filling may be present, requiring repair or replacement, after which it will be treated similarly to an intact tooth.
Step By Step Simple Veneer Preparation
Step 1: Supragingival veneer margins should be above the gum line. Preparations should be positioned as close to the gingiva as possible without direct contact (Figure 2a). This approach promotes optimal periodontal health during cementation and throughout the lifespan of the restoration and the tooth. The best way to assess the amount of space available based on the desired final external outline is through the use of a silicon matrix. This method allows for a decision on how much of the tooth, if any, needs to be prepared or removed (Figure 2b). The silicone matrix is crafted from the correctly designed “blueprint” waxup (Figure 2c), which follows proper smile design and occlusal analysis. Subsequently, the matrix is cut into an L-shape, facilitating incisal and facial reduction assessment (Figure 2d). A second matrix is later utilized to fabricate prototype provisionals.


Figure 2: (a) Margins are close to the gum without touching it. (b) Silicon matrix. (c) Matrix created from the wax-up. (d) Silicon matrix cut.
Step 2: 1-1.15mm of space or tooth reduction is needed for the incisal edge. If sufficient space already exists due to wear or fracture, additional reduction is unnecessary. Simply flatten the incisal edge to 100-degrees from the cervical plane. Achieving the 1 to 1.5mm reduction can be done using a diamond bur which is 1mm in the middle of the cutting surface and 1.5mm at the base of the cutting surface (Figure 2e). Depth cuts are provided by sinking the diamond bur to its full thickness in multiple spots along the incisal edge. The incisal reduction should be at 90 degrees or greater from the gingival plane to ensure a facial path or insertion, ending in the incisal-lingual butt. This is preferred over a wrap-in to the lingual surface (Figure 2f) [1,2,3]. The facial incisal transition should be gently rounded (Figure 2g), followed by joining all depth cuts to achieve a nearly consistent 1mm reduction.

Figure 2: (e) Incisal edge depth cuts. (f) Incisal reduction 90 degrees for cervical aspect. (g) Incisal reduction gently rounded.
Step 3: Regardless of space, cervical margin reduction will be done in all cases. The purpose of this is to create enough room for the thin porcelain to be seated without creating “steps” between the porcelain and tooth. This also aids in indexing the restoration for easier orientation during bonded cementation. While the ideal scenario is that the preparation remains on the enamel, the cervical area is typically thinnest at the enamel, so dentin will sometimes be exposed. Creating a thin feldspathic porcelain margin demands significant skill, as it is virtually impossible to make porcelain below 0.3mm, realistically, achieving 0.4-0.5mm is the best we can hope for. Therefore, the target is a 0.4mm cervical reduction and margin. The 0.3-0.4mm depth cuts will be created using the same chamfer diamond bur.
The diamond should be aligned parallel to the cervical plane and sunk about halfway into the tooth, approximately 0.4mm deep, considering the diamond’s 0.8mm ion thickness at the tip. Marking the depth of the cut with a sharp pencil is a helpful technique to get even reduction post-depth cuts. Then alter the diamond’s angulation and join the depth cuts. There should be a consistent 0.4mm reduction when the marks disappear.
Step 4: The mid-tooth facial reduction should be approximately 0.6mm of reduction or space, parallel to the facial plane of the tooth. Complete several depth cuts, mark them with a pencil, then blend them together. By the time the pencil marks have erased, the desired 0.6mm reduction will be achieved.
Step 5: Sink the margins halfway into the interproximal region. This typeof preparation never breaks contact, the objective is to bring the repair halfway to the contact point (refer to Figure 2m). It’s crucial to examine the tooth from both sides to confirm that the cavosurface margin is not exposed. The purpose of this is to not be able to detect the cavosurface margin when viewing the mesial or distal areas. The proximal margin can be in full contact if the color is ideal, with cavosurface margins remaining more superficial.
Step 6: In certain instances, the contact may need to be positioned deeper interproximally, necessitating a step to break contact very slightly. This adjustment can be achieved using a metal strip, refining the interproximal surface. Any J-shaped margin should be removed, and create a slight separation to allow the laboratory to see the margins and create a properly adapted restoration. Unless dictated by an existing open contact, deliberately and unnecessarily breaking full contact and having porcelain in lingual contact would be disadvantageous. With changes in the patient’s bite over time, porcelain on the lingual side is more prone to breakage when in contact with opposing teeth.
Step 7: Place a triple “0” retraction cord and take a final impression of the full arch using a highly hydrophobic impression material, such as Panasil (Kettenbach).
Step 8: Using a silicon matrix of the wax up, provisionalize. Enhance retention with spot bonding.
There are special considerations when it comes to this veneer prep, including a badly damaged vital tooth and an endodontically treated tooth. These will be discussed in a later article.
We hope this article was valuable to you. Our mission is to provide proven, real-world practical techniques, resources, articles and videos to help the community of caring dentists, who value the benefits of minimally invasive Supra-gingival dentistry, expand their knowledge and achieve clinical success, thus giving their patients a healthier form of dentistry.
For updates on newly published articles, courses, and more, sign up to the community.
Los Angeles Institute of Clinical Dentistry & Ruiz Dental Seminars Inc. uses reasonable care in selecting and providing content that is both useful and accurate. Ruiz Dental Seminars is not responsible for any damages or other liabilities (including attorney’s fees) resulting or claimed to result in whole or in part, from actual or alleged problems arising out of the use of this presentation. The techniques, procedures and theories on this presentation are intended to be suggestions only. Any dental professional viewing this presentation must make his or her own decisions about specific treatment for patients.
Sources
- Magne P, Douglas WH. Design optimization and evolution of bonded ceramics for the anterior dentition: a finite-element analysis. Quintessence Int, 1999; 30(10): 661-672.
- Guess PC, Selz CF, Voulgarakis A, Stampf S, Stappert CF. Prospective clinical study of press-ceramic overlap and full veneer restorations: 7-year results. Int J Prosthodont, 2014; 27(4): 355-358.
- Cheung W. A review of the management of endodontically treated teeth. Post, core and the final restoration. J Am Dent Assoc, 2005; 136(5): 611-619.