

Source: Supra-Gingival Minimally Invasive Dentistry: A Healthier Approach to Esthetic Restorations, published by Wiley-Blackwell
A crucial step in ensuring a correct retention and marginal seal of bonded restorations is bonded cementation. Clinicians are at times greatly concerned about bonded cementation of indirect onlays or veneers and don’t embrace this technique. Some may prefer a full crown procedure because traditional crowns and bridges can be cemented successfully with traditional crown and bridge cements that are easy to use and rarely cause sensitivity [1,2], like resin reinforced glass ionomer cements.
While some see that procedure as easier, the effect on the tooth and gingiva can be extensive. See in Figure 1 that the crown being cemented with resin modified glass ionomer cement has significant tooth removed and subgingival margins.

Figure 1
While it is easy to understand why some clinicians stay away from bonded restorations. First, postoperative sensitivity can irritate dentists and patients after the bonded cementation of indirect bonded restorations [3,4]. Second, the complexity of isolation can be challenging, and some educators suggest that unless a rubber dam is used, the adhesive procedure will not succeed or will be poor quality. Third, resin cementation is thought to be a difficult and sensitive technique, especially resin cement removal. This is because once it acquires its full hardness, removal of excess can be difficult. However, these concerns can be overcome with training, and it’s important to remember that proper preparation leads to much easier cementation. The implementation of a supragingival protocol that can simplify the process, as well as choosing the correct materials.
In Figure 2, see how much more predictable and easier isolation is when margins are supragingival compared to bleeding subgingival margins for bonded onlays.

Figure 2
When bonding an indirect restoration, there will always be two substrates being bonded together by resin cement and an adhesive. The correct choice of both is of great importance. The two surfaces/substrates that will be joined together, the tooth surface (enamel and/or dentin) and the restoration surface or intaglio surface needs to be prepared prior to bonded cementation.
Choosing the Correct Resin Cement
The characteristics of resin cement make them the ideal type of cement for bonded indirect restorations, such as [5,6]:
- High tensile strength
- High compressive strength
- Low modulus of elasticity
- Low solubility
Using strong adhesive resin cements enhances the strength of composite, feldspathic porcelain, and lithium disilicate restorations [7], although they have a minimal effect on zirconia and alumina.
There are many different types of resin cements. They can be characterized as chemically (self) cured, light-cured, and dual-cured depending on the type of activator used for polymerization. Other than self-adhesive type cements, most resin cements don’t adhere to the tooth without the help of a dental adhesive or bonding system.
There are many other differences between the alternative types of resin cements, including:
- Filler particle size
- Available colors
- Opacity
- Consistency
- Speed of curing
Avoiding opacious cements, which will decrease the translucency of the choice of restorative material and force the need to hide margins subgingival, is crucial. Additionally, choosing a cement with excellent chameleon characteristics, such as the ability to blend with other colors and absorbing them is important as it simplifies choosing the shade of cement.
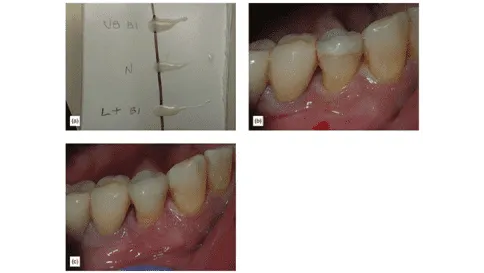
In Figure 3, examine the three drops of opacious, medium, and translucent cements, each showing different effects covering a line. Without cement, the restoration lacks a visual connection with the tooth. In the final image (c) translucent cement shows an improved visual connection.

Figure 3
Step By Step Onlay Bonded Cementation
The tooth
- Isolate using your chosen method after dental anesthesia and the removal of the provisional (Figure 4a).
- Completely clean the tooth of remnant cement using MicroEtcher (Danville). If composite build ups were done, this is especially important. A scrub or pumice is a second option.
- Adjust the onlay must be adjusted for proper proximal contacts and fit. Do not expect the fit of a porcelain onlay to match the fit of a gold onlay. A slight opening in the margin is normal with porcelain, and resin cement will be used to seal those slight openings permanently (Figure 4b).
- See Intaglio Onlay Preparation below.
- Etch the enamel selectively for 10 seconds and carefully avoid touching the dentin (Figure 4c).
- Wash completely with water and dry The tooth is dry when it is not shiny. It is never desirable to desiccate the tooth (Figure 4d).
- Apply your bonding system of choice (such as Clearfil SE Protect primer) for 20-25 seconds over the dentin and the enamel, agitating it on the dentin (Figure 4e).
- Remove the solvent with air until the liquid stops moving (Figure 4f).
- Put one drop of the second bottle of Clearfil SE Protect in a well and mix with a dual-cure activator, and apply thinly over enamel and dentin. Do not cure.
- Apply your cement of choice to either the tooth or the restoration and set the restoration (Figure 4g).
- Clean gross excess cement with either a microbrush or plastic tip. Avoid removing it from the margin (Figure 4h).
- Apply pressure to the onlay during cementation, as this increases the strength of the bond [8,9] and seats the restoration fully with less space taken by the cement.
- Light cure for one cycle (time depends on light being used), leaving a cement that is hard, but not super hard. An alternative procedure is to spot cure facial and lingual margins to stabilize, then gel the reminder with brief light cure. Remove the gel. If desired, a metal matrix may be placed through the gel in the contact zones. Then fully light cure (Figure 4i).
- After confirming that the cement is firm, use a no. 12 blade to remove excess cement (Figure 4j).
- Attempt to pass some floss. If this is unsuccessful, use an interproximal finishing tool, such as a Cerisaw (DenMat).
- After the cement has been removed, flood the tooth with an oxygen inhibitor (such as Liquid Lens, Danvill, glycerin-based gel), and do a final cure, one cycle facial, one cycle lingual, one cycle occlusal, using water to keep the tooth cool.
- Full polymerization of dual-cure cements is indispensable and increases success.
- Without this, a layer of resin will always be uncured, as resin cannot cure in the presence of oxygen. The oxygen-inhibited layer can be 0.25-0.5 mm of uncured resin. Incorrect curing of the cement will lead to the creation of a channel or ditch.
- Make final bite adjustments:
- Isolate the area with cotton rolls, then use blue thin articulating paper (such as Artifol, Bausch, metallic test film).
- Ask the patient to tap their teeth together hard, twice (it helps to say to the patient “tap, tap”). Mark will usually show on the working cusp and central groove (Figure 5a).
- As soon as there is equal contact throughout the area, use a differently colored paper (red) and ask the patient to grind their teeth (“grind, grind, grind, exaggerate the grind, forward, back, sideways”) (Figure 5b).
- Whatever is marked in red outside the blue area is an interference and must be removed.
- Adjustments are complete when the centric contacts and the lateral movements are on top of each other.
- Having the patient sit up to do a final adjustment is an option, although the results will usually be the same. Sometimes you find an additional adjustment that needs to be made, as there is a slight difference in the bite from laying back to sitting upright.
- Polish the porcelain using the Sof-Lex (3M) or Dialite (Brasseler) finishing and polishing system.


Figure 4: (a) Isolation. (b) Adjusting onlay. c) Selective enamel etching. (d) After drying, frosted enamel. (e) Applying primer. (f) Removing solvent. (g) Applying cement on onlay. (h) Removing excess using a gum messenger. (i) Light-cure onlay for one cycle. (j) Using a no.12 blade.

Figure 5: (a) After “tap tap,” blue marks are visible. (b) Red marks outside the blue.
Intaglio Onlay Preparation
- Prepare the porcelain for adhesion with hydrochloric acid, and Ultradent Porcelain Etch.
- Pressed feldspathic is etched for 1 minute, lithium disilicate for 20 seconds. Over-etching weakens the ceramic surface so it is undesirable.
- Note: Onlays may come pre-etched from the laboratory. If so, after making adjustments, only re-etch for 10 seconds or less, to remove contaminants. Alternatively, cleaning may be done with phosphoric acid.
- Wash and dry the porcelain thoroughly. Porcelain needs to be bone-dry before applying the ceramic primer (silane).
- Apply the ceramic primer and leave for 1 minute, then air dry.
- Applying resin is not necessary.
- If using some brands of silane, apply for 1 minute, dry, then apply bond.
- The restoration is ready. When using a ceramic primer, there is no need to protect the onlay from ambient light.
- If using zirconia, use these intaglio onlay preparation instructions.
To view a cementation of 3 porcelain onlays using a self-etch bonding system and handling clinical complications, watch this free video in our online streaming video library.
If you want to delve deeper into this topic, come joining us for our next Porcelain Onlays and Full Crowns Using Supra-Gingival Dentistry workshop. Dr. Jose-Luis Ruiz will demonstrate a new paradigm in preparation and cementation for porcelain onlays. Dr. Jose-Luis Ruiz will show step-by-step how using supra-gingival dentistry techniques and understanding the specific characteristics of these new materials can make dentistry easier and more predictable than ever. He will show step-by-step the techniques and principles for tooth preparation, temporization, and sensitive-free, easily bonded cementation.
We hope this article was valuable to you. Our mission is to provide proven, real-world practical techniques, resources, articles and videos to help the community of caring dentists, who value the benefits of minimally invasive Supra-gingival dentistry, expand their knowledge and achieve clinical success, thus giving their patients a healthier form of dentistry.
For updates on newly published articles, courses, and more, sign up to the community.
Los Angeles Institute of Clinical Dentistry & Ruiz Dental Seminars Inc. uses reasonable care in selecting and providing content that is both useful and accurate. Ruiz Dental Seminars is not responsible for any damages or other liabilities (including attorney’s fees) resulting or claimed to result in whole or in part, from actual or alleged problems arising out of the use of this presentation. The techniques, procedures and theories on this presentation are intended to be suggestions only. Any dental professional viewing this presentation must make his or her own decisions about specific treatment for patients.
Sources
- Lindquist TJ, Connolly J. In vitro microleakage of luting cements and crown foundation material. J Prosthet Dent, 2001; 85(3): 292-298.
- Ruiz JL, Mitra S. Utilizing RMGI as a liner for direct composite restorations. Compend Contin Educ Dent, 2006; 27: 347-351.
- Kramer N, Frankenberger R. Clinical performance of bonded leucite reinforced glass ceramic inlays and onlays after 8 years. Dent Mater, 2005; 21:367-271.
- Berkowitz G, Horowitz A, Curro FA, Craig RG, Ship JA, Vena D, Thompson VP. Postoperative hypersensitivity in class I resin-based composite restorations in general practice: Interim results. Compend Contin Educ Dent, 2009; 30(6): 356-363.
- Stamatacos C, Simon JF. Cementation of indirect restorations: an overview of resin cements. Compend Contin Educ Dent, 2013; 34(1): 42-46.
- Sakaguchi RL, Powers JM. Materials for adhesion and luting. In Craig’s Restorative Dental Materials. 13th ed. Philadelphia, PA: Elsevier; 2012; pp. 327-348.
- Christensen GJ. Are tooth colored onlays viable alternatives to crowns? Clin Rep, 2012; 5(1): 1,3.
- Goracci C, Cury AH, Cantoro A, Papacchini F, Tay FR, Ferrari M. Microtensile bond strength and interfacial properties of self-etching and self-adhesive resin cements used to lute composite onlays under different seating forces. J Adhes Dent, 2006; 8(5): 327-335.
- Chieffi N, Chersoni S, Papacchini F, Vano M, Goracci C, Davidson CL, Tay FR, Ferrari M. Effect of the seating pressure on the adhesive bonding of indirect restorations Am J Dent, 2006; 19(6): 333-335.
- Foxton RM, Pereira PN, Nakajima M, Tagami J, Miura H. Durability of the dual-cure resin cement/ceramic bond with different curing strategies. J Adhes Dent, 2002; 4(1): 49-59.